
How to Give Access to Your Hostinger Account
In today’s fast-moving digital world, your hosting account is a gateway to your online presence. Whether you’re working with a developer, marketer, or team member, learning how to give access to your Hostinger account safely is essential. Giving access the right way saves time, increases efficiency, and, most importantly, keeps your data safe.
At Crafted Campus, we often guide clients on managing access to their digital assets. That’s why we’ve put together this comprehensive guide on how to give access to your Hostinger account without compromising your security.
✅ Why Share Access the Right Way?
Here’s why it’s smart to follow Hostinger’s built-in method for sharing account access:
🔒 Keep your account secure – Let developers or teammates manage hosting, emails, or files without needing your password.
👨💻 Delegate tasks easily – Hand over access without any hassle.
🚀 Maintain full control – You can revoke access at any time.
How to Give Access to Your Hostinger Account: Step-by-Step Guide
Ready to get started? Here’s how to give access to your Hostinger account in just a few steps:
Step 1: Log in to Your Hostinger Account
Go to 🌐 https://www.hostinger.com and log in using your credentials.

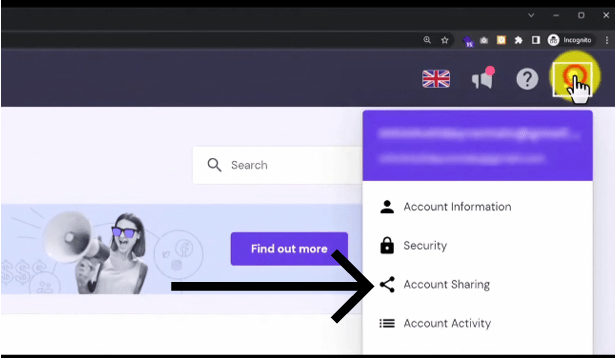
Step 2: Go to “Access Manager”
🔹 Look for the profile icon in the top right corner of your dashboard.
🔹 Click on it and choose Access Manager from the dropdown menu.
Step 3: Click on “Grant Access”
You’ll see a button that says Grant Access – click on it.
Step 4: Enter the Email Address
Type the email address of the person you want to give access to.
💡 Important: This email must be linked to a Hostinger account. If the person doesn’t have one, they’ll be prompted to create one during the process.

Step 5: Choose the Access Level
Hostinger lets you assign specific permission levels:
● Website Management
● Email Accounts
● Domain Settings
● Billing Access (optional)
🔐 Tip: Only grant access to what is necessary. When it comes to security, less is more!
Step 6: Send the Invite
Once everything looks good, click Send Invite.
📨 The invited person will receive an email with instructions to accept the access invitation.
How to Give Access to Your Hostinger Account: Revoke Access Anytime
Changed your mind or no longer working with someone? No problem! Just go back to Access Manager, find the person’s name, and click Revoke Access.
This is one of the best parts of how to give access to your Hostinger account – you stay in full control at all times.
How to Give Access to Your Hostinger Account: A Real-World Example
At Crafted Campus, we manage multiple Hostinger accounts on behalf of our clients. Using the Access Manager feature ensures smooth collaboration between our developers and business owners. There’s no need to share login details or compromise security, which aligns with best practices for web management.
Clients often ask:
“Can I give someone access without giving full control?”
Absolutely! That’s the beauty of Hostinger’s permission-based system. You decide who sees what.
How to Give Access to Your Hostinger Account: Mistakes to Avoid
When learning how to give access to your Hostinger account, it’s just as important to know what not to do:
❌ Don’t share your personal login or password – this makes you vulnerable to hacking and misuse.
❌ Don’t give full access unless it’s necessary – always assign minimal permissions.
❌ Don’t forget to revoke access when someone leaves your team.
By using Hostinger’s Access Manager, you eliminate these risks.
How to Give Access to Your Hostinger Account: Why It Matters for Business Owners 💼
As a business owner, your website is your digital storefront. Giving team members or contractors access without exposing your main credentials is a must.
Here’s why understanding how to give access to your Hostinger account is a valuable skill:
📊 Better Project Management – Developers can handle site setup, file uploads, and plugin installations independently.
🕒 Save Time – You don’t have to be the middleman for every technical task.
🧩 Improved Workflow – Designers, marketers, and SEO teams can work faster when they have direct access.
How to Give Access to Your Hostinger Account: Final Thoughts
Giving access to your hosting account doesn’t have to be risky. Hostinger’s Access Manager makes it easy, secure, and efficient.
Let’s recap the key takeaways:
✅ Don’t share passwords – use Access Manager instead.
✅ Set only the permissions the user needs.
✅ Revoke access when no longer needed.
✅ Stay in full control of your hosting account.
Whether you’re working with a freelance developer or a digital agency like Crafted Campus, knowing how to give access to your Hostinger account empowers you to manage your website safely and professionally.
So the next time someone asks for hosting access, don’t just share your login details. Use this guide on how to give access to your Hostinger account the smart way!
Want Help Managing Your Website?
Visit us at 👉 https://craftedcampus.com.au – we’ll handle everything from web design to secure hosting access setup.
